I completed Stardew Valley’s shipping collection — in reverse
Mar 11th, 2026

Gvendolynn’s video Completing the Entire Stardew Valley Shipping List in Reverse Order inspired me to give the challenge a go and experience the game in a new way. It was more fun than I expected.
The rules and goals of this challenge
Stardew Valley is a RPG style farming game that was published 10 years ago where the player engages in variety of activities like farming, combat, fishing, mining, foraging and relationships. There are multiple things the game tracks for what it calls Perfection, an achievement of doing mostly everything in the game.
One of these things is a shipping list. There are — at the time of this challenge — 154 unique items in this list.
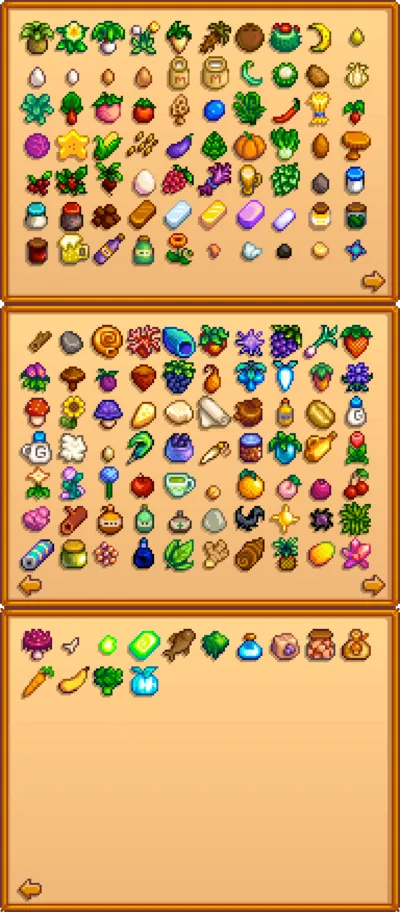
The goal of this challenge is to ship at least one of each item, filling the collection tab.
Rule #1: On any given day, you can only ship items that have already been shipped on previous days or is the last item on the list that has not yet been shipped. So the first item you can ship is a Powdermelon, then the following day you can ship Broccoli, then Summer Squash and so on.
Rule #2: You are not allowed to sell anything outside this list or through any other means. This means you can’t sell regular fish, artifacts, gems and so on.
Rule #3: No mods.
These three are my rules and if you want to complete the challenge with different rules or don’t agree with mine, you’re welcome to do it however you want.
Preparing and planning
I started preparing for this challenge by copying the list of items in reverse order and making notes about how I figure this would go.
I identified a couple of items I considered “chokepoints”. Items that I cannot just decide to buy and grow and ship.
These are:
- #8 Mystic Syrup that requires reaching Foraging Mastery which means you need to first reach level 10 on each of the five skills (Farming, Foraging, Mining, Fishing and Combat) and then gain another 10 000 experience points to reach first level of Mastery and using that to unlock Foraging Mastery.
- #11 Radioactive Bar and #12 Radioactive Ore that require either Danger in the Deep or Skull Cavern Invasion Mr. Qi’s Special Order to be active. For that to be active, you need to 1) complete either the Community Center or JojaMart Community Development Projects to unlock Ginger Island and 2) gather 100 golden walnuts to unlock Mr Qi’s room.
- Ostrich Egg which is quite an elusive item that requires Ginger Island access and either finding 10 Journal Scraps or a tiny probability of finding one in a rare chest in the Volcano. This has usually been one of the last things I get in a regular full Perfection run.
- Void Egg and Void Mayonnaise require either an upgraded Coop and a low-probability Witch event or donating 60 items to the Museum and gaining access to Krobus.
- Not quite a chokepoint because it’s easy to achieve but needs to be taken into account: to gain access to Tea Leaves (and then Green Tea), you need 2 hearts friendship with Caroline. It’s not hard but it takes a bit of time so if you want to guarantee you don’t get a gap between days, you should do it early.
On my early notes before starting, I considered #10 Smoked Fish to be the main money maker in this run and I did focus quite a lot on it during the run. We’ll learn later I was wrong.
My planned approach
Since Dried Fruits and Smoked Fish are very early on the list, I made a decision to start on a Riverlands Farm because that comes with a free Fish Smoker and that I would choose the Bat Cave when presented with that because it comes with a free Dehydrator. What I didn’t think at this point was that you unlock the cave once you’ve earned 25 000 money so that didn’t come into play at all because that was very late.
While you cannot sell anything, you can gain income through Help Wanted quests and Special Orders but until you can sell your first crops in the winter of year 1, you’ll be very limited with your money.
Since money is tight and we still need a ton of farming experience to reach Mastery, I focused on crops that regrow: strawberries in Spring, blueberries in Summer and cranberries in Fall. This way, I could maximize the amount of experience points I gain per money spent and all of these are fruit so I can sell them relatively early as Dried Fruit once I reach that point.
Another early money maker is Dried Mushrooms so as soon as I was able to, I crafted a dozen Mushroom Logs to gain consistent supply of mushrooms to dry and sell.
Lastly, I decided for the first time in my life to go with the Joja route. I have owned this game for over 9 years and have played for way over 1000 hours but I have never bought a Joja membership before. This time I did because I figured I need to get to Ginger Island early and getting all the specific items for the Community Center would be very difficult given I had almost no money to spend.
The actual gameplay
I mostly followed my plan, realizing way too late that smoking fish didn’t matter at all.
I can’t remember when was the last time I played this game without mods. It was kinda painful. Not having access to quality of life improvements like the information UI Info Suite 2 displays makes planning way harder when you can’t know what crops are growing, when they’ll be ready or where you are in your skill progression.
One of the first realizations was that reaching Fishing level 10 with just the Bamboo Rod is so much harder and time consuming compared to buying a better rod and using bait like I usually do. Spending money on the fishing rods wasn’t a smart thing since you can’t get money back from fishing until year 2 or so. I got to level 10 fishing around mid-summer, year 1.
As is usual, Foraging was the hardest skill to complete. I crafted Wild Seeds and prioritized getting to Steel Axe to access Secret Woods to get hardwood and experience.
I completed Joja Community Development Projects in Winter 20th, Year 1 and after fixing the boat, I gained access to Ginger Island Winter 22nd, Year 1 which was way faster than I expected. The Special Orders that open in the beginning of Fall net you a ton of money that I wasn’t expecting to be that big.
I eventually gained Mastery on Spring 8, Year 2 and reached the first level of Mastery on the 18th. I gained access to Mr. Qi’s room on Spring 22, Year 2.
I got super duper lucky that my first Qi’s task was the Skull Cavern Invasion that I needed. That was a lucky strike as I that could have been weeks, even months before it showed up. I kept spamming the first floor of Skull Cavern over and over again until I was able to get 6 Radioactive Ore and got even luckier that I got a Rabbit’s foot on the first trip to the Skull Cavern.
I managed to get a Banana Sapling by trading 5 Dragon Tooth to Island Trader on Spring 26, Year 2 and the Rusty Key by donating 60 items to the Museum on Summer 3, Year 2.
Finally, Summer 14th Year 2 I collected my first Mystic Syrup and then kept shipping items one by one until the end of the challenge. At the time I got the Mystic Syrup, I had everything else ready as I spent the time waiting for that tree to grow and the syrup to happen building the required animal buildings. Basically after that day, I slept, shipped the new allowed item and slept some more.
I made 90% of my money from selling Dried Strawberries. As soon as I got the Greenhouse unlocked, I filled it with strawberries and did the same in Ginger Island. When I shipped my first Smoked Fish, I already had all the money I needed to complete the challenge.
Challenge retrospective
I had a lot of fun with this challenge, even though some aspects like reaching Mastery without upgrading other tools than my axe was kinda painful and annoying. But it forced me to play in a very different way than I usually do: I couldn’t go my regular route of buying ~500 blueberry seeds on Summer 1 to finance everything. I think I had money to buy like 20 of them instead and couldn’t even sell them.
I finished the run in 35 hours. I may have done nothing else all weekend and I’m not sure if it was worth it but I had a blast and had no other responsibilities so I’m kinda happy I did.
What surprised me, I only had one gap between shipping. That was the gap from Winter 14, Year 1 after I had shipped Raisins to Summer 14, Year 2 when I managed to ship a Mystic Syrup. Everything else was shipped the day after the previous. So there were only 56 days when I didn’t ship something.
I also expected to need Skull Cavern much more. I expected to need it to gain majority of my experience for mining and combat but I didn’t as the regular mines provided more than enough. I only did one run there.
If something above resonated with you, let's start a discussion about it! Email me at juhamattisantala at gmail dot com and share your thoughts. This year, I want to have more deeper discussions with people from around the world and I'd love if you'd be part of that.