Building a website with a static site generator, part 2: Eleventy
Mar 18th, 2020
In this series:
- Part 1: Building a website with a static site generator, part 1: Setup
- Part 2: Building a website with a static site generator, part 2: Eleventy
- Part 3: Building a website with a static site generator, part 3: Domain, Analytics and Forms
In the previous post in this series, we created accounts, created new projects and set up a basic website with Eleventy, Netlify, Netlify CMS and GitHub. In this post, we're gonna take a deeper look into Eleventy which takes care of building the website by combining layout templates with blog post data from Markdown files.
First, let's start by making some changes. At the end of this post, you can find more information about the project structure and configuration if you want to dig a bit deeper into Eleventy.
Update metadata.json
If you run npx eleventy --serve and open localhost:8080, you see instructions to update _data/metadata.json so let's open that first.
{
  "title": "Your Blog Name",
  "url": "https://myurl.com/",
  "description": "I am writing about my experiences as a naval navel-gazer.",
  "feed": {
    "subtitle": "I am writing about my experiences as a naval navel-gazer.",
    "filename": "feed.xml",
    "path": "/feed/feed.xml",
    "id": "https://myurl.com/"
  },
  "author": {
    "name": "Your Name Here",
    "email": "youremailaddress@example.com"
  }
}
This file contains basic information that is used in different places in your website. It's a very handy place to store basic information about your site and yourself so that if for example your email address changes, you only need to change it in one place rather than trying to remember to change it everywhere.
Remove instructions block from your layout
Head over to _includes/layouts/base.njk and remove the div with class warning at lines 28–35.
Customize layout
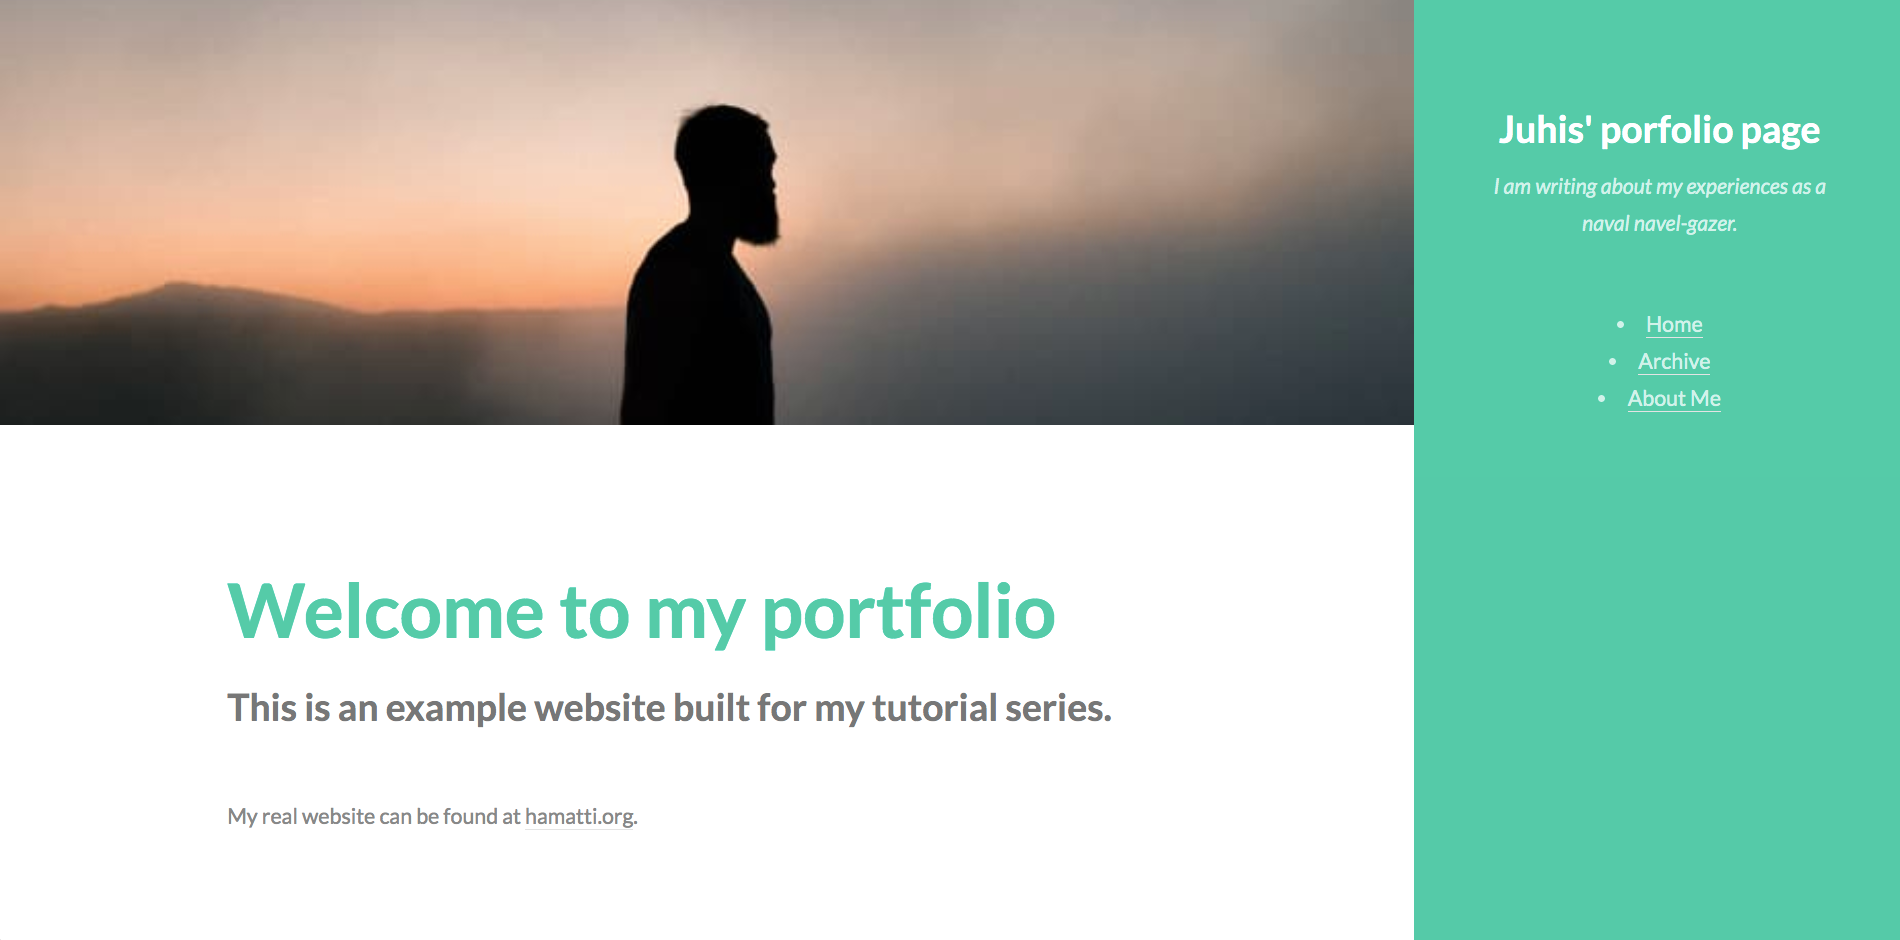
The default starter pack looks simple and for your personal site, you probably want to build something custom. I am not much of a designer myself so I've been using HTML5Up's layouts for years now. They are HTML+CSS templates that are free to use under CC BY 3.0 license (meaning you can use, modify and do whatever you want as long as you give credit to them).
Copy CSS & Javascript over
Let's see how I would make Read Only layout fit into this project. First, I download and unzip it into a temporary folder. It is a single-page layout but we can simply use the same looks for separate pages. Then, I'll copy everything from assets/css/ to /css folder in our project and replace the stylesheet links in base.njk (change index.css -> main.css and add one for fontawesome-all.min.css. Second, I move the entire /assets/js folder to the root of our project. To make sure these JS files are accessible in our site, we also need to add a passthroughCopy setting in .eleventy.js:
eleventyConfig.addPassthroughCopy("js");The layouts from HTML5Up tend to have a lot of Javascript and eventually I end up removing it all but something might break if you just don't have them at all so I'll leave pruning the unneeded Javascript for homework if you wish to get rid of them. Add <script> tags into base.njk to load those Javascript files into your site.
Copy & modify HTML
Next, I often copy the body from the Read Only's index.html file into our base.njk and adjust individual HTML tags and classes to match the structure and nunjucks loops that we have in our page. This is one of the most tedious parts of taking these kind of existing layouts into Eleventy. But luckily we pretty much only have to do it once.
What I did at this point, was replacing the entire <body> tag of the original base.njk with the <body> of the Read Only template. Then I only left elements I want to have there every time: <header>, <nav> and the basic structure of <div id="wrapper"><div id="main"></div></div>.
I then replaced the <ul> in the <nav> with what we originally had to maintain our navigation.
Finally, I took the front page content (anything we replaced with and took that into index.njk. Here I replaced the first section with short introduction on who I am and copied what we had there before into the second section:
<section id="two">
<div class="container">
<h3>Recent blog posts</h3>
<p>
More posts can be found in
<a href="/posts/">the archive</a>.
</p>
</div>
</section>At this point, you also need to start thinking about what kind of structure and content you want to have in your page. Do you want to show your recent blog posts in the front page or dedicate the front page for telling about yourself and your skills?
Individual post page
The original post page only showed the title and the content but we might want to customize it a bit more. The way our Netlify CMS was set up, we are able to add a featured image that gets stored into a variable thumbnail. We can use that to show the picture in the beginning of the post.
_includes/layouts/post.njk
<section id="one">
  <div class="image main" data-position="center">
    <img src="" alt="" />
  </div>
  <div class="container">
    <h2>Building a website with a static site generator, part 2: Eleventy</h2>

  </div>
</section>
You can use similar approaches based on what fits your needs and which template you decide to use. If you want to build your own from scratch, there's less integration to do but requires deeper knowledge on frontend design and CSS.
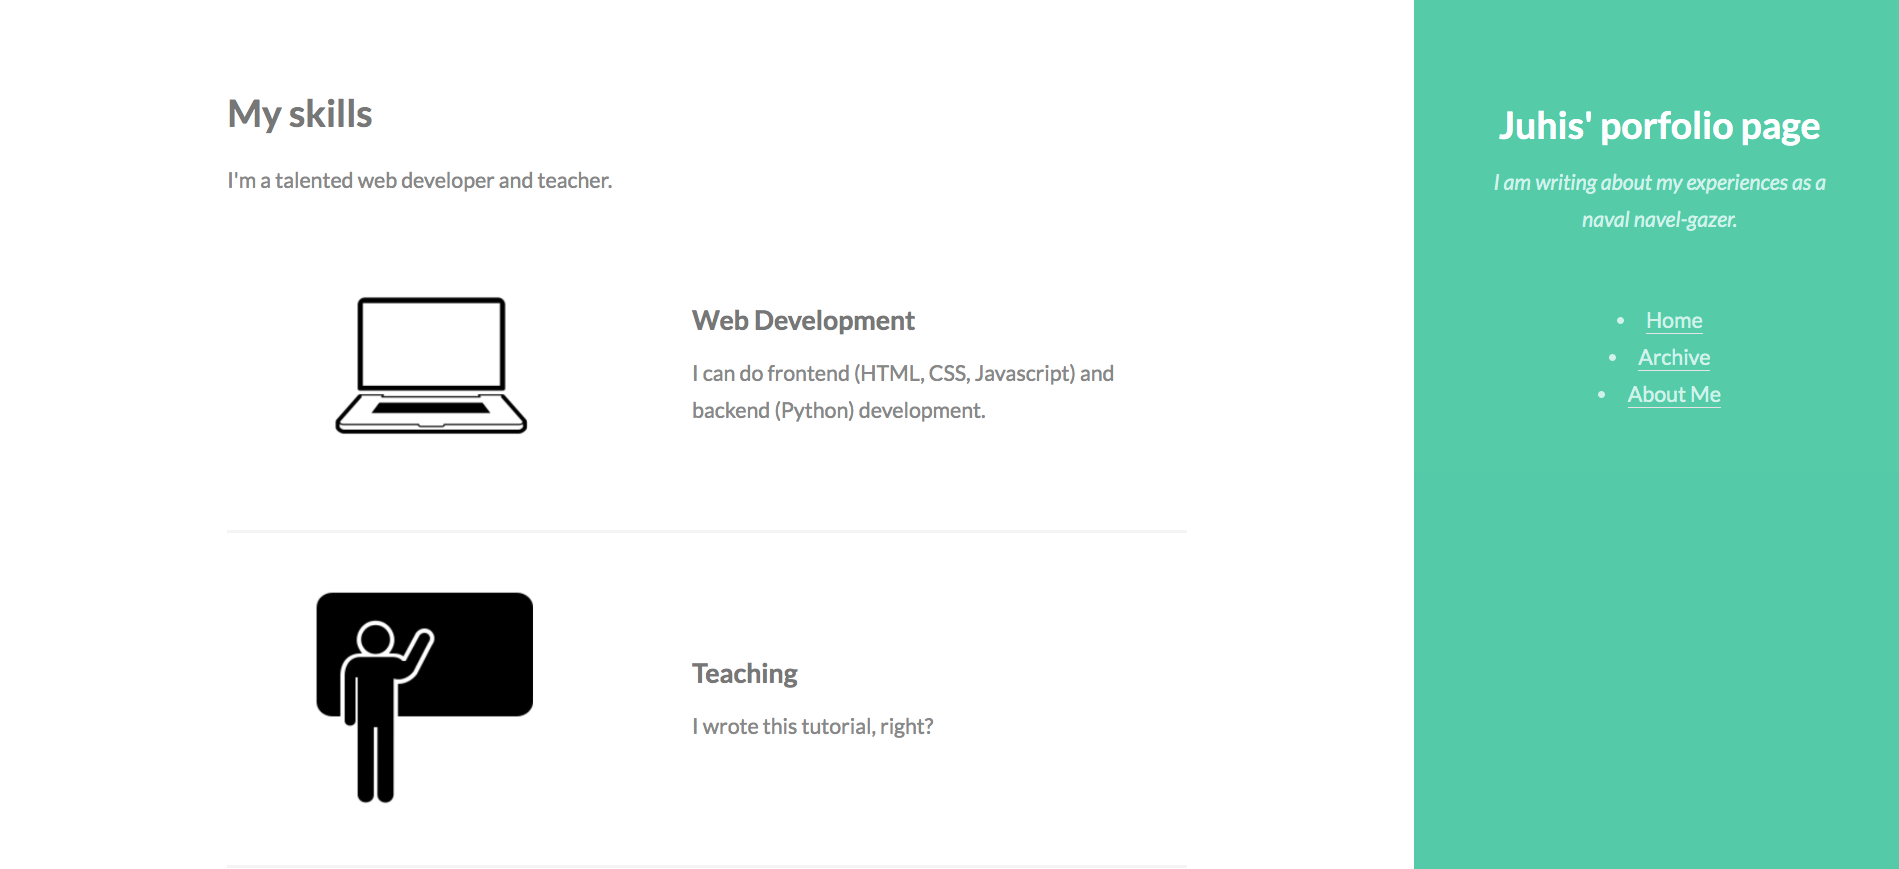
Skills section
Now we have a blog but as it's our portfolio page, maybe we also care about showcasing our skills. There are a couple of ways to do this.
_includes/skills.njk
First approach is to hard code all our skills into a snippet in a new file _includes/skills.njk.
To do this, I'll copy the third section from our Read Only template because it looks like a good layout for showcasing skills. It uses pictures that are not provided so I'll create a couple of decorative images that match my skills.
In this case, the _includes/skills.njk is just HTML listing out stuff. It can be a good approach if we only need to show those in one place and there's not many of them.
<section id="three">
  <div class="container">
    <h3>My skills</h3>
    <p>
      I'm a talented web developer and teacher.
    </p>
    <div class="features">
      <article>
        <a href="#" class="image"
          ><img src="images/web-development.png" alt=""
        /></a>
        <div class="inner">
          <h4>Web Development</h4>
          <p>
            I can do frontend (HTML, CSS, Javascript) and backend (Python) development.
          </p>
        </div>
      </article>
      <article>
        <a href="#" class="image"><img src="images/teacher.png" alt=""/></a>
        <div class="inner">
          <h4>Teaching</h4>
          <p>
            I wrote this tutorial, right?
          </p>
        </div>
      </article>
      <article>
        <a href="#" class="image"><img src="images/fun.png" alt=""/></a>
        <div class="inner">
          <h4>Having fun</h4>
          <p>
            Oh boi!
          </p>
        </div>
      </article>
    </div>
  </div>
</section>
Another approach is to build a new collection of skills and display them on the website:
Instead of creating _includes/skills.njk, create a new folder skills/ in the root of project. For each skill, create a separate markdown file, like this:
skills/web-development.md
---
title: Web Development
image: web-development.png
description: I can do frontend (HTML, CSS, Javascript) and backend (Python) development.
tags: skills
---
Repeat this process for all your skills. As we added the tag skills, Eleventy will automatically create a collection collections.skills that we can refer to.
Now, let's create the _includes/skills.njk but this time, instead of hard coding the content, let's build it from our collection.
<section id="three">
  <div class="container">
    <h3>My skills</h3>
    <p>
      I'm a talented web developer and teacher.
    </p>
    <div class="features">

    </div>
  </div>
</section>
This approach makes it much easier for us to manage the skills. To manage which ones we want to show, we can add another field into the front matter (things between - - and - -) named public: true and set that false to items we don't want to display. You can then add an if clause after the for loop to only display the ones that are public:
<section id="three">
  <div class="container">
    <h3>My skills</h3>
    <p>
      I'm a talented web developer and teacher.
    </p>
    <div class="features">

    </div>
  </div>
</section>
Regardless of which approach you took, we need to include this skills.njk somewhere for it to actually be visible. For example, you can add it to your front page with
{% include 'skills.njk' %}You can replicate this process for other things too. Maybe you have some portfolio projects you want to showcase? Make a collection and build a page to display them nicely.
And since we have our CMS system set up, there's no need to keep writing this content inside your code editor. By modifying the admin/config.yml, we can create a new CMS form for our skills. To do that, add the following to the file:
- name: "skills"
  label: "Skills"
  folder: "skills"
  create: true
  slug: ""
  fields:
    - { label: "Title", name: "title", widget: "string" }
    - { label: "Image", name: "image", widget: "image" }
    - { label: "Description", name: "description", widget: "string" }
    - { label: "tags", name: "tags", widget: "hidden", default: "skills" }
    - { label: "Public", name: "public", widget: "boolean" }
Updating our live website
To update the website in Netlify, we need to add our changes to git and push them to GitHub. For brevity and since this is not a git tutorial, I've kept my commit messages very simple. To become better at writing commit messages, I recommend Chris Beams' article How to Write a Git Commit Message.
git add .
git commit -m "Integrate HTML5Up layout"
git push origin master
It will take a moment for Netlify to pick up your changes and deploy them. Once it's done, you can see your changes in your site.
If you want to check them out in live environment before committing to them, instead of committing changes to master branch, you can create a separate branch, push that to GitHub and create a Pull Request. This will trigger Netlify to create a preview deployment like it did when we created a new post using the CMS.
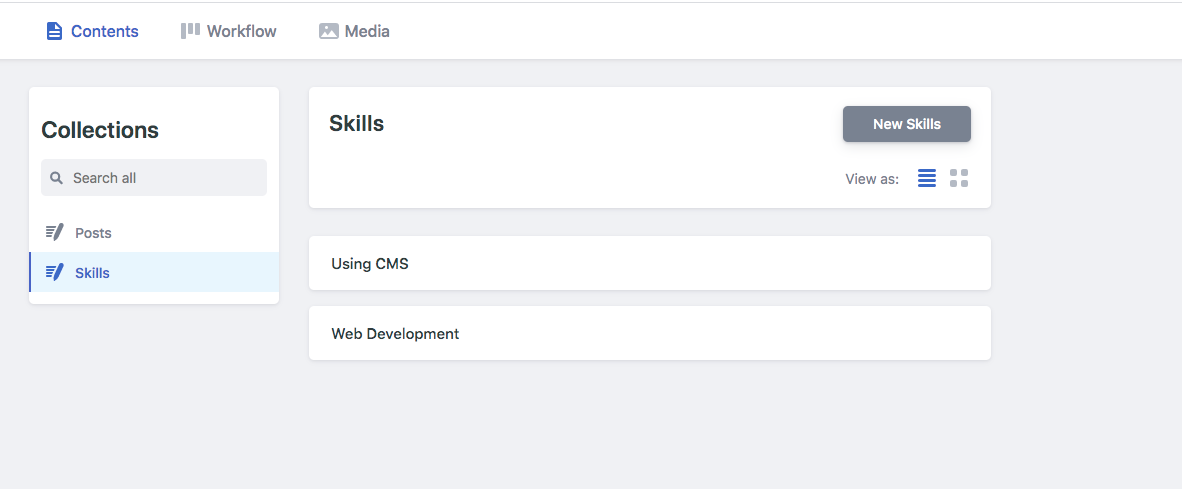
After it's been deployed, try adding a skill via CMS by navigating to /admin and logging in. You should now see a new navigation item in the main navigation called "Skills". Creating a new one will once again create a pull request that you can preview and merge in GitHub.
Netlify in more detail: Project Structure
If you open your project in a code editor (I use Visual Studio Code, a free and really versatile tool), you see that there are quite a lot of files already from the starter project.
_includes
First folder we're gonna look at is _includes. Inside here, you can store snippets and individual components as well as layouts (see below). One file this starter kit comes with is postslist.njk which is a nunjucks template for creating an ordered list of blog posts.
_includes/layouts
Inside _includes/layouts folder you find three files: base.njk, home.njk and post.njk. First one, base.njk is our wrapper layout. It contains the head element with CSS stylesheets, Javascript scripts and other information that we want to have access to on each site. home.njk then uses that layout to build our front page and post.njk does the same for individual blog posts.
_data
Eleventy works with collections and there are couple of ways to define custom collections. One of them is to have a JSON or Javascript file inside _data folder. The name of the file will be the name of the collection (so creating a file numbers.js will give us access to a collection called numbers). Inside the file, you either need to store a valid JSON array or to export a function that returns an array of data. For an imaginary numbers.js collection, we could write:
numbers.json
[1,2,3,4,5,6,7,8,9,10]or we can have a function that returns random numbers from an API
numbers.js
const axios = require("axios");
module.exports = async function() {
  const numbers = await axios
    .get(
      "https://www.random.org/integers/?num=10&min=1&max=6&col=1&base=10&format=plain&rnd=new"
    )
    .then(resp => {
      return resp.data;
    })
    .then(numbers => {
      return numbers
        .split("\n")
        .filter(num => num)
        .map(num => parseInt(num));
    });
  return numbers;
};
Both of these are then accessible in your templates with a reference numbers.
_data/metadata.json
One existing collection in this project is metadata. You should take some time to change its contents to match your site. It's wired into different places into the website currently and you can use it to store basic information you don't want to hard code into your templates like your email address.
about/
To create new pages, you have two options. You can either add a file into the root with the name you want the path to be (for example me.njk will then become localhost:8080/me) or have a folder like about/ with an index file like about/index.md as we can see in our example project. You can use either Markdown files (.md) or any templating files (in our case with Nunjucks, .njk).
img/
We store our image files in img/ folder in the root. These get copied into the final site by our build process.
css/
Same as images, we store our CSS in this folder and it gets copied over.
posts/
Here we save our blog posts. Anything stored in this folder will be available in posts collection. When we use NetlifyCMS, our new posts appear here as Markdown files.
Configuration
One of the key files in any Eleventy project is .eleventy.js that controls our configuration. We can install and activate plugins, define template filters, build new collections and define other things.
Below, I'll walk you through a couple of functions that I use most and you can read more from Eleventy's Configuration documentation.
addPlugin
We can add new plugins with eleventyConfig.addPlugin function. Eleventy has a nice collection of official and community plugins that you can install based on your needs. I haven't used the plugins yet a lot but looking at the list of them right now, I should start using table of contents plugin for my guides.
addFilter
Filters are Javascript functions that take an input, do something and gives output. I use them most for formatting data: for example, an API might return the date in a machine readable format and we want to display it in human readable format like in the first addFilter that already exists in this project:
eleventyConfig.addFilter("readableDate", dateObj => {
  return DateTime.fromJSDate(dateObj, { zone: "utc" }).toFormat(
    "dd LLL yyyy"
  );
});
We can then use this filter in our templates with the pipe operator |:
<time>Invalid DateTime</time>Building custom filters is a good way to keep your templates simple and easy to read while shoving the implementation details inside your Javascript files.
addCollection
Earlier I mentioned one way to create collections is to use _data folder and JSON or Javascript files. Another way is to use addCollection function. The first parameter defines the name of the collection and second is a callback function that returns desired data.
eleventyConfig.addCollection("fruits", function() {
  return ['apple', 'avocado', 'banana'];
})
Next steps
In this post, we learned how to integrate an existing HTML/CSS layout to our Eleventy page and how to build collections and display data. Now it's time for you to make a plan of what you want to showcase in your site and start writing content.
For some ideas, here are some of my favorite websites of developers:
- Sarah Drasner: https://sarah.dev/
- James Stone: https://www.jamesstone.com/
- Sara Soueidan: https://www.sarasoueidan.com/
- Fotis Papadogeorgopoulos: https://fotis.xyz/
- Wes Bos: https://wesbos.com/
- Matthew Williams: http://findmatthew.com/
and you can also take a look around at my website http://hamatti.org/.
In the last part, we'll look into how to buy a domain for your website from Netlify so you can direct your friends, family and potential future employers to a nice URL that tells them it's your home in the Internet.
If something above resonated with you, let's start a discussion about it! Email me at juhis@hamatti.org and share your thoughts. This year, I want to have more deeper discussions with people from around the world and I'd love if you'd be part of that.